
目次
概要
基本的にFlutterはUIのオブジェクトを羅列していくことで画面を作ることができる。
ただ、基本的に縦に羅列するか横に羅列するかがベースになっている。
縦に羅列する場合はColumn、横に羅列する場合はRowを使用する。
ソースコード
アプリ実行部分
import 'package:flutter/material.dart';
import 'package:flutter_riverpod/flutter_riverpod.dart';

import 'ColumnRow/ColumnRowView.dart';

void main() {
  runApp(ProviderScope(child: MyApp()));
}

class MyApp extends StatelessWidget {
  const MyApp({super.key});

  @override
  Widget build(BuildContext context) {
    return MaterialApp(
      title: 'Flutter Demo',
      theme: ThemeData(
        colorScheme: ColorScheme.fromSeed(seedColor: Colors.deepOrange),
        useMaterial3: true,
      ),
      home: const ColumnRowView(title: 'Flutter Demo Home Page'),
    );
  }
}
View表示部分
import 'package:flutter/material.dart';
class ColumnRowView extends StatefulWidget {
const ColumnRowView({super.key, required this.title});
final String title;
@override
State<ColumnRowView> createState() => _ColumnRowViewState();
}
class _ColumnRowViewState extends State<ColumnRowView> {
Widget calendarView() {
return Column(
mainAxisAlignment: MainAxisAlignment.center,
children: <Widget>[
weekView(0),
weekView(1),
weekView(2),
weekView(3),
weekView(4),
],
);
}
Widget weekView(int row) {
final double size = 40;
final double fontSize = 24;
return Row(
mainAxisAlignment: MainAxisAlignment.center,
children: <Widget>[
Container(width: size, height: size,
child: Text("${1 + (7 * row)}",
style: TextStyle(fontSize: fontSize),
)),
Container(width: size, height: size,
child: Text("${2 + (7 * row)}",
style: TextStyle(fontSize: fontSize),
)),
Container(width: size, height: size,
child: Text("${3 + (7 * row)}",
style: TextStyle(fontSize: fontSize),
)),
Container(width: size, height: size,
child: Text("${4 + (7 * row)}",
style: TextStyle(fontSize: fontSize),
)),
Container(width: size, height: size,
child: Text("${5 + (7 * row)}",
style: TextStyle(fontSize: fontSize),
)),
Container(width: size, height: size,
child: Text("${6 + (7 * row)}",
style: TextStyle(fontSize: fontSize),
)),
Container(width: size, height: size,
child: Text("${7 + (7 * row)}",
style: TextStyle(fontSize: fontSize),
)),
],
);
}
@override
Widget build(BuildContext context) {
return Scaffold(
appBar: AppBar(
backgroundColor: Theme.of(context).colorScheme.inversePrimary,
title: Text(widget.title),
),
body: Center(
child: calendarView()
),
);
}
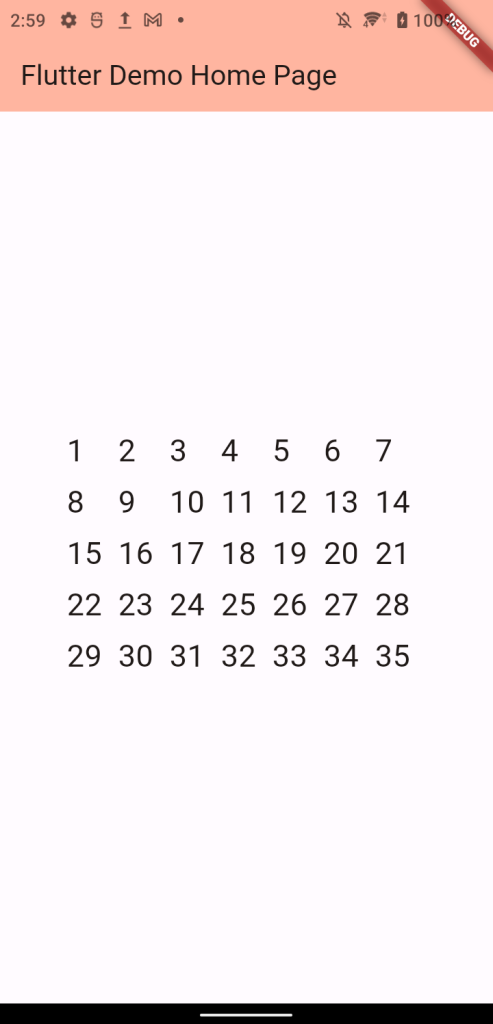
}スクリーンショット
詳細
横並び
横並びに表示する場合は概要の通り、Rowを使用する。
Rowは以下が基本形になる。
Row(
  mainAxisAlignment: /* レイアウト設定 */,
  children: <Widget>[
    /* 縦並びに表示されるUI */
  ],
)
では、今回のコードを見てみよう。
今回のコードで該当する箇所は以下のColumnの部分。
Widget weekView(int row) {
    final double size = 40;
    final double fontSize = 24;

    return Row(
      mainAxisAlignment: MainAxisAlignment.center,
      children: <Widget>[
        Container(width: size, height: size,
            child: Text("${1 + (7 * row)}",
              style: TextStyle(fontSize: fontSize),
            )),
        Container(width: size, height: size,
            child: Text("${2 + (7 * row)}",
              style: TextStyle(fontSize: fontSize),
            )),
        Container(width: size, height: size,
            child: Text("${3 + (7 * row)}",
              style: TextStyle(fontSize: fontSize),
            )),
        Container(width: size, height: size,
            child: Text("${4 + (7 * row)}",
              style: TextStyle(fontSize: fontSize),
            )),
        Container(width: size, height: size,
            child: Text("${5 + (7 * row)}",
              style: TextStyle(fontSize: fontSize),
            )),
        Container(width: size, height: size,
            child: Text("${6 + (7 * row)}",
              style: TextStyle(fontSize: fontSize),
            )),
        Container(width: size, height: size,
            child: Text("${7 + (7 * row)}",
              style: TextStyle(fontSize: fontSize),
            )),
      ],
    );
  }
基本形に当てはめると以下になる
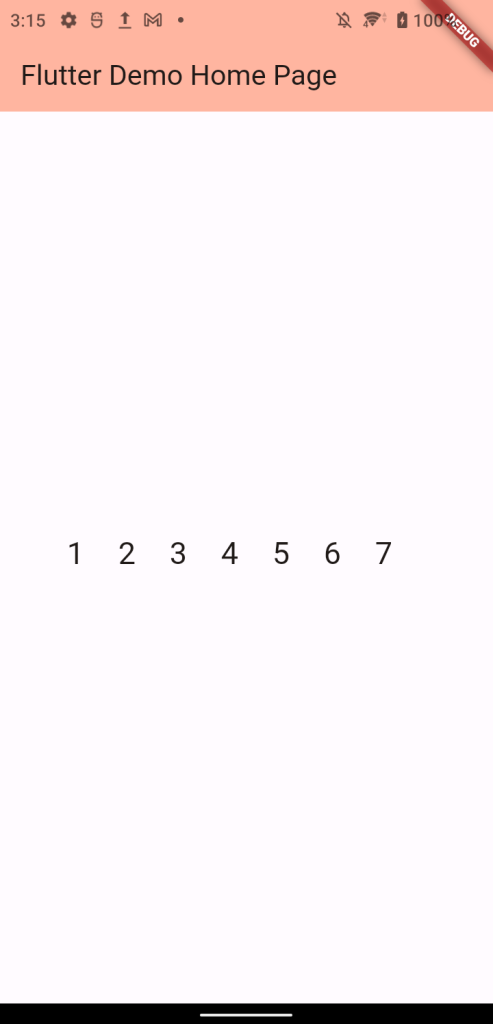
| 項目名 | 設定内容 |
| レイアウト設定 | MainAxisAlignment.center これの設定は画面の中央に詰める |
| 縦並びに表示されるUI | Containerのオブジェクト7つ 今回は詳細は省略するが、幅(width)と高さ(height)を設定し、 childの内容(今回はText)を表示する。 |
ちなみに、上記の部分だけを表示すると以下のようになる。
縦並び
縦に表示する場合は概要の通り、Columnを使用する。
Columnは以下が基本的になる。
Column(
  mainAxisAlignment: /* レイアウト設定 */,
  children: <Widget>[
    /* 縦並びに表示されるUI */
  ],
)
では、今回のコードを見てみよう。
今回のコードで該当する箇所は以下のColumnの部分。
Widget calendarView() {
  return Column(
    mainAxisAlignment: MainAxisAlignment.center,
    children: <Widget>[
      weekView(0),
      weekView(1),
      weekView(2),
      weekView(3),
      weekView(4),
    ],
  );
}
上記の例では以下の通りになっている。
| 項目名 | 設定内容 |
| レイアウト設定 | MainAxisAlignment.center これの設定は画面の中央に詰める |
| 縦並びに表示されるUI | weekView(0), weekView(1), weekView(2), weekView(3), weekView(4) 上記の五つが縦並びに表示される。 そして、そのweekViewは上記のRow(横並びで並べたもの)のこと。 つまり、横並びのものを更に縦に並べることで、 グリッド状のレイアウトを作成できる。 |
発展編
繰り返し文を使用することで、今回の例は以下のようにスマートに書くことができる。
横並び
繰り返し文を使わない場合(サンプルコードの通り)
Widget calendarView() {
  return Column(
    mainAxisAlignment: MainAxisAlignment.center,
    children: <Widget>[
      weekView(0),
      weekView(1),
      weekView(2),
      weekView(3),
      weekView(4),
    ],
  );
}
繰り返し文を使用した場合
Widget calendarView() {
  return Column(
    mainAxisAlignment: MainAxisAlignment.center,
    children: <Widget>[
      for(int row = 0;row < 5;row++)
        weekView(row),
    ],
  );
}
縦並び
繰り返し文を使わない場合(サンプルコードの通り)
Widget weekView(int row) {
    final double size = 40;
    final double fontSize = 24;

    return Row(
      mainAxisAlignment: MainAxisAlignment.center,
      children: <Widget>[
        Container(width: size, height: size,
            child: Text("${1 + (7 * row)}",
              style: TextStyle(fontSize: fontSize),
            )),
        Container(width: size, height: size,
            child: Text("${2 + (7 * row)}",
              style: TextStyle(fontSize: fontSize),
            )),
        Container(width: size, height: size,
            child: Text("${3 + (7 * row)}",
              style: TextStyle(fontSize: fontSize),
            )),
        Container(width: size, height: size,
            child: Text("${4 + (7 * row)}",
              style: TextStyle(fontSize: fontSize),
            )),
        Container(width: size, height: size,
            child: Text("${5 + (7 * row)}",
              style: TextStyle(fontSize: fontSize),
            )),
        Container(width: size, height: size,
            child: Text("${6 + (7 * row)}",
              style: TextStyle(fontSize: fontSize),
            )),
        Container(width: size, height: size,
            child: Text("${7 + (7 * row)}",
              style: TextStyle(fontSize: fontSize),
            )),
      ],
    );
  }
繰り返し文を使用した場合
Widget weekView(int row) {
  final double size = 40;
  final double fontSize = 24;

  return Row(
    mainAxisAlignment: MainAxisAlignment.center,
    children: <Widget>[
      for (int column = 0;column < 7;column++)
        Container(width: size, height: size,
            child: Text("${(column + 1) + (7 * row)}",
              style: TextStyle(fontSize: fontSize),
            )),
    ],
  );
}